3. Usage
To use melusine in a project:
import melusine
3.1. Melusine input data : Email DataFrames
The basic requirement to use Melusine is to have an input e-mail DataFrame with the following columns:
body: Body of an email (single message or conversation historic)
header: Header of an email
date: Reception date of an email
from: Email address of the sender
to: Email address of the recipient
label(optional) : Label of the email for a classification task (examples: Business, Spam, Finance or Family)
body |
header |
date |
from |
to |
label |
|---|---|---|---|---|---|
Thank you.\nBye,\nJohn |
Re: Your order |
jeudi 24 mai 2018 11 h 49 CEST |
A |
In the examples presented below, a toy email DataFrame containing anonymized emails is used. The toy DataFrame can be loaded as follows:
from melusine.melusine.utils.data_loader import load_email_data

df_emails = load_email_data()
df_emails.head()
3.2. Prepare email subpackage : Basic usage
A common pre-processing step is to check whether an e-mail is an answer or not. This can be done in Melusine with the function add_boolean_answer:
from melusine.prepare_email.manage_transfer_reply import add_boolean_answer

df_emails['is_answer'] = df_emails.apply(add_boolean_answer, axis=1)
A new column is_answer is created containing a boolean variable:
True if the message is an answer
False if the message is not an answer
body |
header |
is_answer |
|---|---|---|
Happy Birthday Bill!! |
Birthday |
False |
Thank you |
Re: Birthday |
True |
3.3. Create an email pre-processing pipeline
An email pre-processing pipeline takes an email DataFrame as input and executes a sequence of Transformers on every email in the DataFrame. The recommended way to create a pre-processing pipeline with Melusine is to:
Wrap pre-processing functions in TransformerScheduler objects.
Use a Scikit-Learn Pipeline object to chain transformers
Once the pipeline has been set-up, the pre-processing of an email DataFrame is straightforward:
>>> df_emails_preprocessed = pipeline.fit_transform(df_emails)
3.3.1. TransformerScheduler class
Functions can be wrapped in a TransformerScheduler object that can be integrated into an execution Pipeline.
TransformerScheduler objects are compatible with the scikit-learn API
(they have fit and transform methods).
A TransformerScheduler object is initialized with a functions_scheduler argument.
The functions_scheduler argument is a list of tuples containing information about the desired pre-processing functions.
Each tuple describe an individual function and should contain the following elements:
A function
A tuple with the function’s arguments (if no arguments are required, use None or an empty tuple)
A column(s) name list returned by the function (if no arguments are required, use None or an empty list)
The code below describes the definition of a transformer:
from melusine.utils.transformer_scheduler import TransformerScheduler

melusine_transformer = TransformerScheduler(
functions_scheduler=[
    (my_function_1, (argument1, argument2), ['return_col_A']),
    (my_function_2, None, ['return_col_B', 'return_col_C'])
    (my_function_3, (argument1, ), None),
mode='apply_by_multiprocessing',
n_jobs=4)
])
The other parameters of the TransformerScheduler class are:
mode(optional): Define mode to apply function along a row axis (axis=1) If set to ‘apply_by_multiprocessing’, it uses multiprocessing tool to parallelize computation. Possible values are ‘apply’ (default) and ‘apply_by_multiprocessing’
n_jobs(optional): Number of cores used for computation. Default value, 1. Possible values are integers ranging from 1 (default) to the number of cores available for computation
A TransformerScheduler can be used independently or included in a scikit pipeline (recommended):
>>> # Used independently
>>> df_emails = melusine_transformer.fit_transform(df_emails)
>>> # Used in a scikit pipeline
>>> from sklearn.pipeline import Pipeline
>>> pipeline = Pipeline([('MelusineTransformer', melusine_transformer)])
>>> df_emails = pipeline.fit_transform(df_emails)
The fit_transform method returns a DataFrame with new features (new columns)
body |
header |
return_col_A |
return_col_B |
return_col_C |
return_col_D |
|---|---|---|---|---|---|
Happy Birthday Bill!! |
Birthday |
new_feature_A |
new_feature_B |
new_feature_C |
new_feature_D |
Thank you |
Re: Birthday |
new_feature_A |
new_feature_B |
new_feature_C |
new_feature_D |
3.3.2. Chaining transformers in a scikit-learn pipeline
Once all the desired functions and transformers have been defined, transformers can be chained in a Scikit-Learn Pipeline. The code below describes the definition of a pipeline:
from sklearn.pipeline import Pipeline

pipeline = Pipeline([
    ('TransformerName1', TransformerObject1),
    ('TransformerName2', TransformerObject2),
    ('TransformerName3', TransformerObject3),
])
3.3.3. Example of a working pipeline
A working pre-processing pipeline is given below:
from sklearn.pipeline import Pipeline
from melusine.utils.transformer_scheduler import TransformerScheduler
from melusine.prepare_email.manage_transfer_reply import add_boolean_answer, add_boolean_transfer
from melusine.prepare_email.build_historic import build_historic
from melusine.prepare_email.mail_segmenting import structure_email

ManageTransferReply = TransformerScheduler(
    functions_scheduler=[
        (add_boolean_answer, None, ['is_answer']),
        (add_boolean_transfer, None, ['is_transfer'])
])

HistoricBuilder = TransformerScheduler(
    functions_scheduler=[
        (build_historic, None, ['structured_historic']),
])

Segmenting = TransformerScheduler(
    functions_scheduler=[
        (structure_email, None, ['structured_body'])
])

prepare_data_pipeline = Pipeline([
    ('ManageTransferReply', ManageTransferReply),
    ('HistoricBuilder', HistoricBuilder),
    ('Segmenting', Segmenting),
])

df_emails = prepare_data_pipeline.fit_transform(df_emails)
In this example, the pre-processing functions applied are:
add_boolean_answer : Email is an answer (True/False)
add_boolean_transfer : Email is transferred (True/False)
build_historic : When email is a conversation, reconstructs the individual message historic
structure_email : Splits parts of each messages in historic and tags them (tags: Hello, Body, Greetings, etc)
3.4. Create a custom email pre-processing function
Creating a custom pre-processing function and adding it to a pre-processing pipeline can be done easily with Melusine. Two main requirements are:
Make the function compatible with the pandas apply method
- First argument should be ‘row’ (Row of an email DataFrame)
Example: row[‘header’] will contain the header of a message
Make sure to call existing columns of the DataFrame
Don’t call row[‘is_answer’] before the ‘is_answer’ column has been created
The following example creates a custom function to count the occurrence of a word in the body of an email:
import pandas as pd
from sklearn.pipeline import Pipeline
from melusine.utils.transformer_scheduler import TransformerScheduler
from melusine.prepare_email.manage_transfer_reply import add_boolean_answer, add_boolean_transfer

# Create a fake email Dataframe
df_duck = pd.DataFrame({
    "body" : ["Lion Duck Pony", "Duck Pony Pony", "Duck Duck Pony"],
    "header" : ["zoo report", "Tr : zoo report", "Re : zoo report"]
})

# Define a custom function
def count_word_occurrence_in_body(row, word):
    all_word_list = row["body"].lower().split()
    word_occurence = all_word_list.count(word)
    return word_occurence

# Wrap function in a transformer
CountWordOccurrence = TransformerScheduler(
functions_scheduler=[
    (count_word_occurrence_in_body, ("duck",), ['duck_count']),
    (count_word_occurrence_in_body, ("pony",), ['pony_count']),
])

# Create a second transformer with regular Melusine functions
ManageTransferReply = TransformerScheduler(
functions_scheduler=[
    (add_boolean_answer, None, ['is_answer']),
    (add_boolean_transfer, None, ['is_transfer'])
])

# Chain transformers in a pipeline
prepare_data_pipeline = Pipeline([
    ('CountWordOccurrence', CountWordOccurrence), # Transformer with custom functions
    ('ManageTransferReply', ManageTransferReply), # Transformer with regular Melusine functions
])

# Pre-process input DataFrame
df_duck_prep = prepare_data_pipeline.fit_transform(df_duck)
body |
header |
duck_count |
pony_count |
is_answer |
is_transfer |
|---|---|---|---|---|---|
Lion Duck Pony |
zoo report |
1 |
1 |
False |
False |
Duck Duck Pony |
Re : zoo report |
2 |
1 |
True |
False |
Duck Pony Pony |
Tr : zoo report |
1 |
2 |
False |
False |
Note : It is totally fine to mix regular and custom functions in a transformer.
3.5. Testing a function on a single email
Since all pre-processing functions are made compatible with pandas apply function, a function can be tested on a single email. In the example below, the function add_boolean_answer is tested on a single email:
from melusine.prepare_email.manage_transfer_reply import add_boolean_answer

email_index = 2
email_is_answer = add_boolean_answer(df_emails.iloc[email_index])
print("Message %d is an answer: %r" %(email_index, email_is_answer))
Output:
"Message 2 is an answer: True"
3.6. NLP tools subpackage
The different classes of the NLP tools subpackage are described in this section.
3.6.1. Phraser
The Melusine Phraser class transforms common multi-word expressions into single elements:
>>> new york -> new_york
To train a Melusine Phraser (which is based on a Gensim Phraser),
the input email DataFrame should contain a ‘clean_body’ column which can be created with the clean_body function.
In the example below, a Phraser is trained on a toy DataFrame:
import pandas as pd
from melusine.nlp_tools.phraser import Phraser
from melusine.nlp_tools.phraser import phraser_on_text

phraser = Phraser()
df_new_york = pd.DataFrame({
    'clean_body' : ["new york is so cool", "i love new york", "new york city"]
})

phraser.train(df_new_york)

df_new_york['clean_body'] = df_new_york['clean_body'].apply(phraser_on_text, args=(phraser,))

# Save the Phraser instance to disk
phraser.save('./pretrained_phraser.pickle')
# Load the Phraser
pretrained_phraser = Phraser().load('./pretrained_phraser.pickle')
In reality, a training set with only 3 emails is too small to train a Phraser.
For illustrative purpose, the table below shows the expected output.
clean_body |
clean_body_new |
|---|---|
new york is so cool |
new_york is so cool |
i love new york |
i love new_york |
new york city |
new_york city |
The specific parameters of the Phraser class are:
common_terms: list of stopwords to be ignored (default value = stopword list from NLTK)
threshold: threshold to select collocations
min_count: minimum count of word to be selected as collocation
3.6.2. Tokenizer
A tokenizer splits a sentence-like string into a list of sub-strings (tokens). The Melusine Tokenizer class is based on a NLTK regular expression tokenizer which uses a regular expression (regex) pattern to tokenize the text:
import pandas as pd
from melusine.nlp_tools.tokenizer import Tokenizer

df_tok = pd.DataFrame({
    'clean_body' : ["hello, i'm here to tokenize text. bye"],
    'clean_header' : ["re: hello"],
})

tokenizer = Tokenizer(input_column='clean_body')
df_tok = tokenizer.fit_transform(df_tok)
A new column tokens is created with a list of the tokens extracted from the text data.
clean_body |
clean_header |
tokens |
|---|---|---|
hello, i’m here to tokenize text. bye |
re: hello |
[‘hello’, ‘i’, ‘here’, ‘tokenize’, ‘text’, ‘bye’] |
The specific parameters of the Tokenizer class are:
stopwords: list of keywords to be ignored (this list can be defined in the conf file)
stop_removal: True if stopwords should be removed, else False
3.6.3. Embeddings
With a regular representation of words, there is one dimension for each word in the vocabulary (set of all the words in a text corpus). The computational cost of NLP tasks, such as training a neural network model, based on such a high dimensional space can be prohibitive. Word embeddings are abstract representations of words in a lower dimensional vector space. One of the advantages of word embeddings is thus to save computational cost.
The Melusine Embedding class uses the Gensim Word2Vec module to train a word2vec model.
The trained Embedding object will be used in the Models subpackage to train a Neural Network to classify emails.
The code below illustrates how the Embedding class works. It should be noted that, in practice, to train a word embedding model, a lot of emails are required:
import pandas as pd
from melusine.nlp_tools.embedding import Embedding

df_embeddings = pd.DataFrame({
    'clean_body' : ["word text word text data word text"],
    'clean_header' : ["re: hello"],
})

embedding = Embedding(input_column='clean_body', min_count=3)
embedding.train(df_embeddings)

# Save the trained Embedding instance to disk
embedding.save('./pretrained_embedding.pickle')

# Load the trained Embedding instance
pretrained_embedding = Embedding().load('./pretrained_embedding.pickle')

# Use trained Embedding to initialise the Neural Network Model
# The definition of a neural network model is not discussed in this section
# nn_model = NeuralModel("...", pretrained_embedding=pretrained_embedding, "...")
3.7. Summarizer subpackage
The main item of the Summarizer subpackage is the KeywordGenerator class.
The KeywordGenerator class extracts relevant keywords in the text data based on a tf-idf score.
Requirements on the input DataFrame to use a KeywordGenerator:
KeywordGenerator requires a ‘tokens’ column which can be generated with a Tokenizer
Keywords can then be extracted as follows:
import pandas as pd
from melusine.summarizer.keywords_generator import KeywordsGenerator
from melusine.nlp_tools.tokenizer import Tokenizer


df_zoo = pd.DataFrame({
    'clean_body' : ["i like lions and ponys and gorillas", "i like ponys and tigers", "i like tigers and lions", "i like raccoons and unicorns"],
    'clean_header' : ["things i like", "things i like", "things i like", "things i like"]
})

tokenizer = Tokenizer(input_column='clean_body')
# Create the 'tokens' column
df_zoo = tokenizer.fit_transform(df_zoo)

keywords_generator = KeywordsGenerator(n_max_keywords=2, stopwords=['like'])
# Fit keyword generator on the text data corpus (using the tokens column)
keywords_generator.fit(df_zoo)
# Extract relevant keywords
keywords_generator.transform(df_zoo)
In the text data of the example, some words are very common such as “i”, “like” or “things”, whereas other words are rare, such as “raccoons”. The keyword generator gives priority to rare words in the keyword extraction process:
clean_body |
clean_header |
tokens |
keywords |
|---|---|---|---|
i like lions and ponies and gorillas |
things i like |
[things, i, i, lions, and, ponies, and, gorillas] |
[lions, ponys] |
i like ponies and tigers |
things i like |
[things, i, i, ponies, and, tigers] |
[ponies, tigers] |
i like tigers and lions |
things i like |
[things, i, i, tigers, and, lions] |
[tigers, lions] |
i like raccoons and unicorns |
things i like |
[things, i, i, raccoons, and, unicorns] |
[raccoons, unicorns] |
The specific parameters of the KeywordGenerator class are:
max_tfidf_features: size of vocabulary for tfidf
keywords: list of keyword to be extracted in priority (this list can be defined in the conf file)
stopwords: list of keywords to be ignored (this list can be defined in the conf file)
resample: when DataFrame contains a ‘label’ column, balance the dataset by resampling
n_max_keywords: maximum number of keywords to be returned for each email
n_min_keywords: minimum number of keywords to be returned for each email
threshold_keywords: minimum tf-idf score for a word to be selected as keyword
3.8. Models subpackage
The main item of the Models subpackage is the NeuralModel class.
The NeuralModel creates a Neural Network that can be trained and used to classify emails.
The minimum input features required by the NeuralModel class are the following:
An email DataFrame with:
an integer ‘label’ column (a label encoder can be used to convert class names into integers)
a ‘clean_text’ column with text data
An instance of the Embedding class (Trained word embedding model)
The code below shows a minimal working example for Email Classification using a NeuralModel instance (a much larger training set is required to obtain meaningful results):
import pandas as pd

# Prepare email
from melusine.utils.transformer_scheduler import TransformerScheduler
from melusine.prepare_email.manage_transfer_reply import \
    check_mail_begin_by_transfer, update_info_for_transfer_mail, add_boolean_answer, add_boolean_transfer
from melusine.prepare_email.build_historic import build_historic
from melusine.prepare_email.mail_segmenting import structure_email
from melusine.prepare_email.body_header_extraction import extract_last_body, extract_header
from melusine.prepare_email.cleaning import clean_body, clean_header
from melusine.prepare_email.metadata_engineering import MetaDate, MetaExtension, Dummifier

# Scikit-Learn API
from sklearn.pipeline import Pipeline

# NLP tools
from melusine.nlp_tools.phraser import Phraser
from melusine.nlp_tools.phraser import phraser_on_body
from melusine.nlp_tools.phraser import phraser_on_header
from melusine.nlp_tools.tokenizer import Tokenizer
from melusine.nlp_tools.embedding import Embedding

# Summarizer
from melusine.summarizer.keywords_generator import KeywordsGenerator

# Models
from melusine.models.train import NeuralModel
from melusine.models.neural_architectures import cnn_model

# Load toy email data
from utils.data_loader import load_email_data
df_emails = load_email_data()

# Transformer object to manage transfers and replies
ManageTransferReply = TransformerScheduler(
    functions_scheduler=[
        (check_mail_begin_by_transfer, None, ['is_begin_by_transfer']),
        (update_info_for_transfer_mail, None, None),
        (add_boolean_answer, None, ['is_answer']),
        (add_boolean_transfer, None, ['is_transfer'])
    ]
)

# Transformer object to segment the different messages in the email, parse their metadata and
# tag the different part of the messages
Segmenting = TransformerScheduler(
    functions_scheduler=[
        (build_historic, None, ['structured_historic']),
        (structure_email, None, ['structured_body'])
    ]
)

# Transformer object to extract the body of the last message of the email and clean it as
# well as the header
LastBodyHeaderCleaning = TransformerScheduler(
    functions_scheduler=[
        (extract_last_body, None, ['last_body']),
        (clean_body, None, ['clean_body']),
        (clean_header, None, ['clean_header'])
    ]
)

# Transformer object to apply the phraser on the texts
phraser = Phraser().load('./phraser.pickle')
PhraserTransformer = TransformerScheduler(
    functions_scheduler=[
        (phraser_on_body, (phraser,), ['clean_body']),
        (phraser_on_header, (phraser,), ['clean_header'])
    ]
)

# Tokenizer object
tokenizer = Tokenizer(input_column="clean_body")

# Full preprocessing pipeline
PreprocessingPipeline = Pipeline([
    ('ManageTransferReply', ManageTransferReply),
    ('Segmenting', Segmenting),
    ('LastBodyHeaderCleaning', LastBodyHeaderCleaning),
    ('PhraserTransformer', PhraserTransformer),
    ('tokenizer', tokenizer)
])

# Apply preprocessing pipeline to DataFrame
df_emails = PreprocessingPipeline.fit_transform(df_emails)

# Pipeline to extract dummified metadata
MetadataPipeline = Pipeline([
    ('MetaExtension', MetaExtension()),
    ('MetaDate', MetaDate()),
    ('Dummifier', Dummifier())
])

# Apply MetaData processing pipeline to DataFrame
df_meta = MetadataPipeline.fit_transform(df_emails)

# Keywords extraction
keywords_generator = KeywordsGenerator(n_max_keywords=3)
df_emails = keywords_generator.fit_transform(df_emails)

# Train an embedding with the 'clean_body' data
pretrained_embedding = Embedding(input_column='clean_body', min_count=3)
pretrained_embedding.train(df_emails)

# Create a 'clean_text' column from the 'clean_header' and 'clean_body' columns
df_emails['clean_text'] = df_emails['clean_header']+'. '+df_emails['clean_body']

# Create a training set DataFrame with MetaData + the 'clean_text' columns
X = pd.concat([df_emails['clean_text'],df_meta],axis=1)

# The 'label' column contains target labels for email classification
# Labels should be encoded ('Family', 'Work', 'Sport' => 1, 2, 3)
from sklearn.preprocessing import LabelEncoder
y = df_emails['label']
le = LabelEncoder()
y = le.fit_transform(y)

# CNN model with 'clean_text' as text_input and 'extension', 'dayofweek', 'hour', 'min'
# as metadata input
nn_model = NeuralModel(neural_architecture_function=cnn_model,
                       pretrained_embedding=pretrained_embedding,
                       text_input_column="clean_text",
                       meta_input_list=['extension', 'dayofweek', 'hour', 'min'],
                       n_epochs=10)

# Train the Neural Network model
nn_model.fit(X,y)

# Predict labels on the training dataset
y_res = nn_model.predict(X)

# Decode prediction results (1, 2, 3 => 'Family', 'Work', 'Sport')
y_res = le.inverse_transform(y_res)

# Print results
print(y_res)
The specific parameters of the NeuralModel class are:
neural_architecture_function: function which returns a Neural Network Model instance from Keras
pretrained_embedding: pretrained embedding (Embedding class object)
text_input_column: input text column to consider for the model (Example: ‘clean_body’)
meta_input_list: list of the names of the columns containing the metadata If empty list or None the model is used without metadata Default value, [‘extension’, ‘dayofweek’, ‘hour’, ‘min’]
vocab_size: size of vocabulary for neural network model
seq_size: maximum size of input for neural model
loss: loss function for training (Default ‘categorical_crossentropy’)
batch_size: size of batches for the training of the neural network model
n_epochs: number of epochs for the training of the neural network model
We integrate 3 main classifier neural networks, respectively recurrent, convolutional and attentive. Each of the proposed architecture employs a distinct mathematical operation.
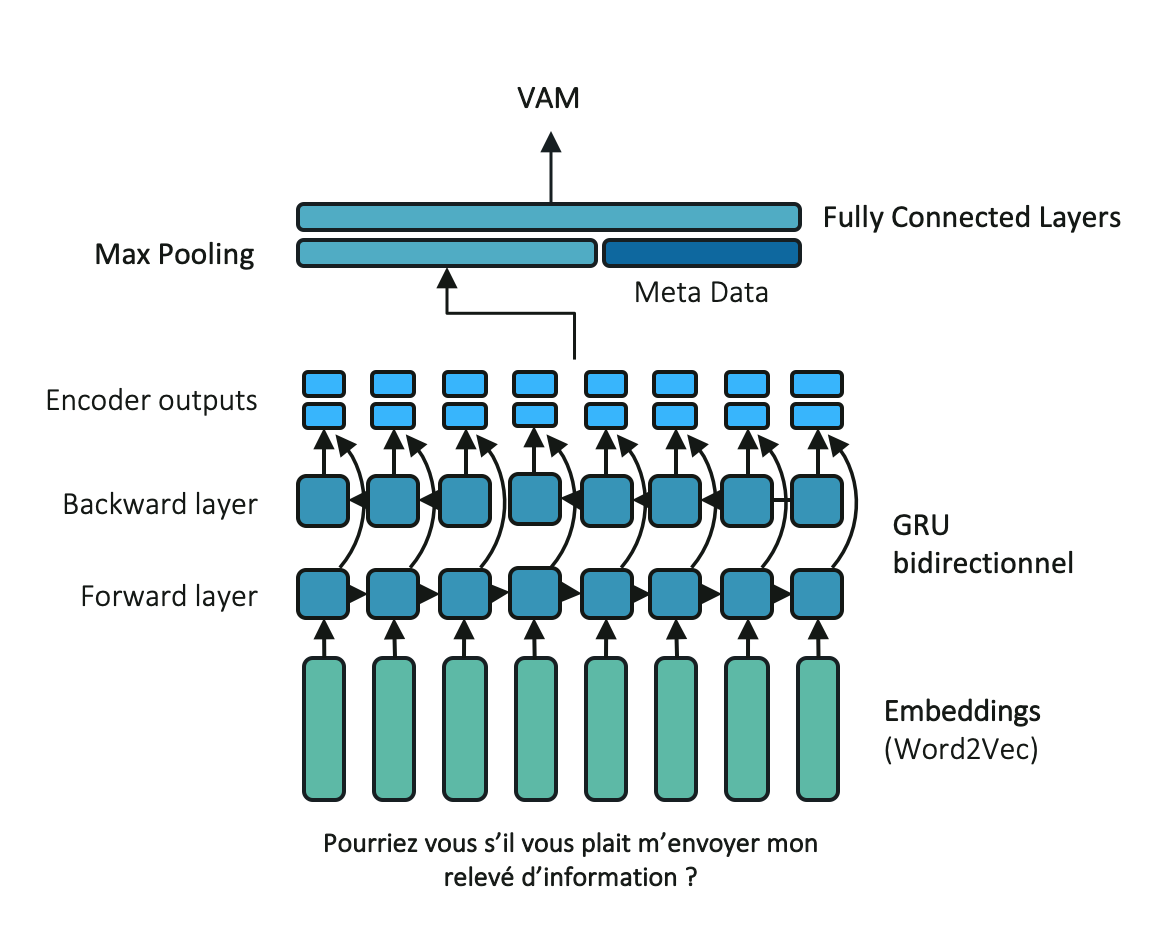
3.8.1. Recurrent Neural Network Classifier (RNN)
RNN are traditionally used with textual data as they are specifically designed to handle sequentially structured data. Inputs are sequentially computed given a cell operation, generally a LSTM or GRU cell. at each step, the current input as well as the output from the previous step are used to compute the next hidden state. The proposed architecture includes a 2-layers bidirectional GRU networks. The network last hidden state is used as the final sentence embedding.
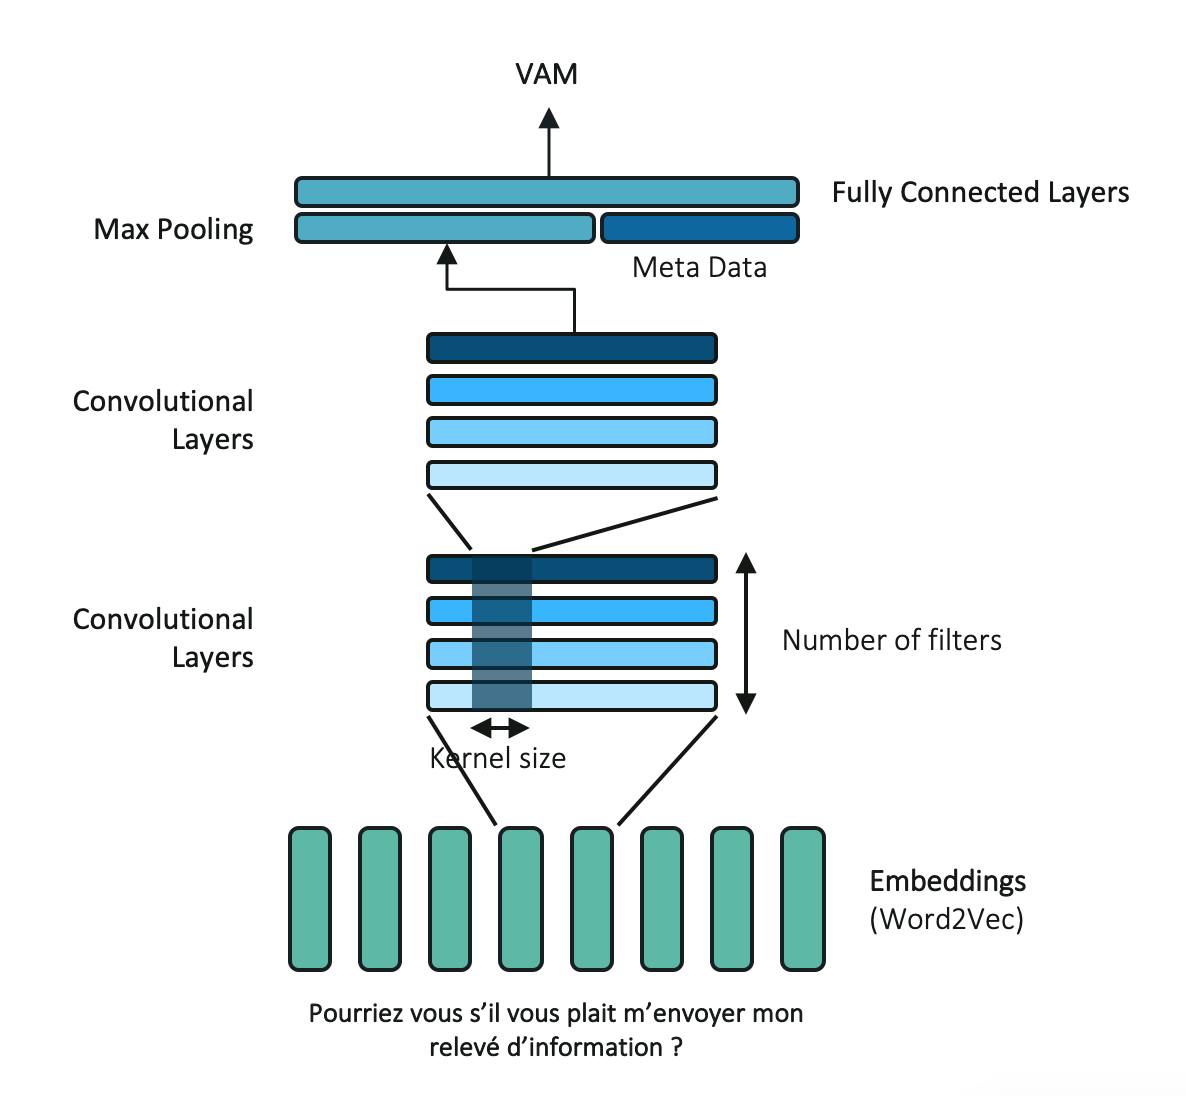
3.8.2. Convolutional Neural Network Classifier (CNN)
CNN uses multiple filters to distinguish patterns in data. Such filters are assembled across the hidden layers to build more complex patterns and structures. The last layer should therefor capture a global and generic representation of the data. In our architecture, we use a two hidden layers CNN with respectively 200 filters for each hidden layer. The last hidden states are aggregated using a max pooling operation.
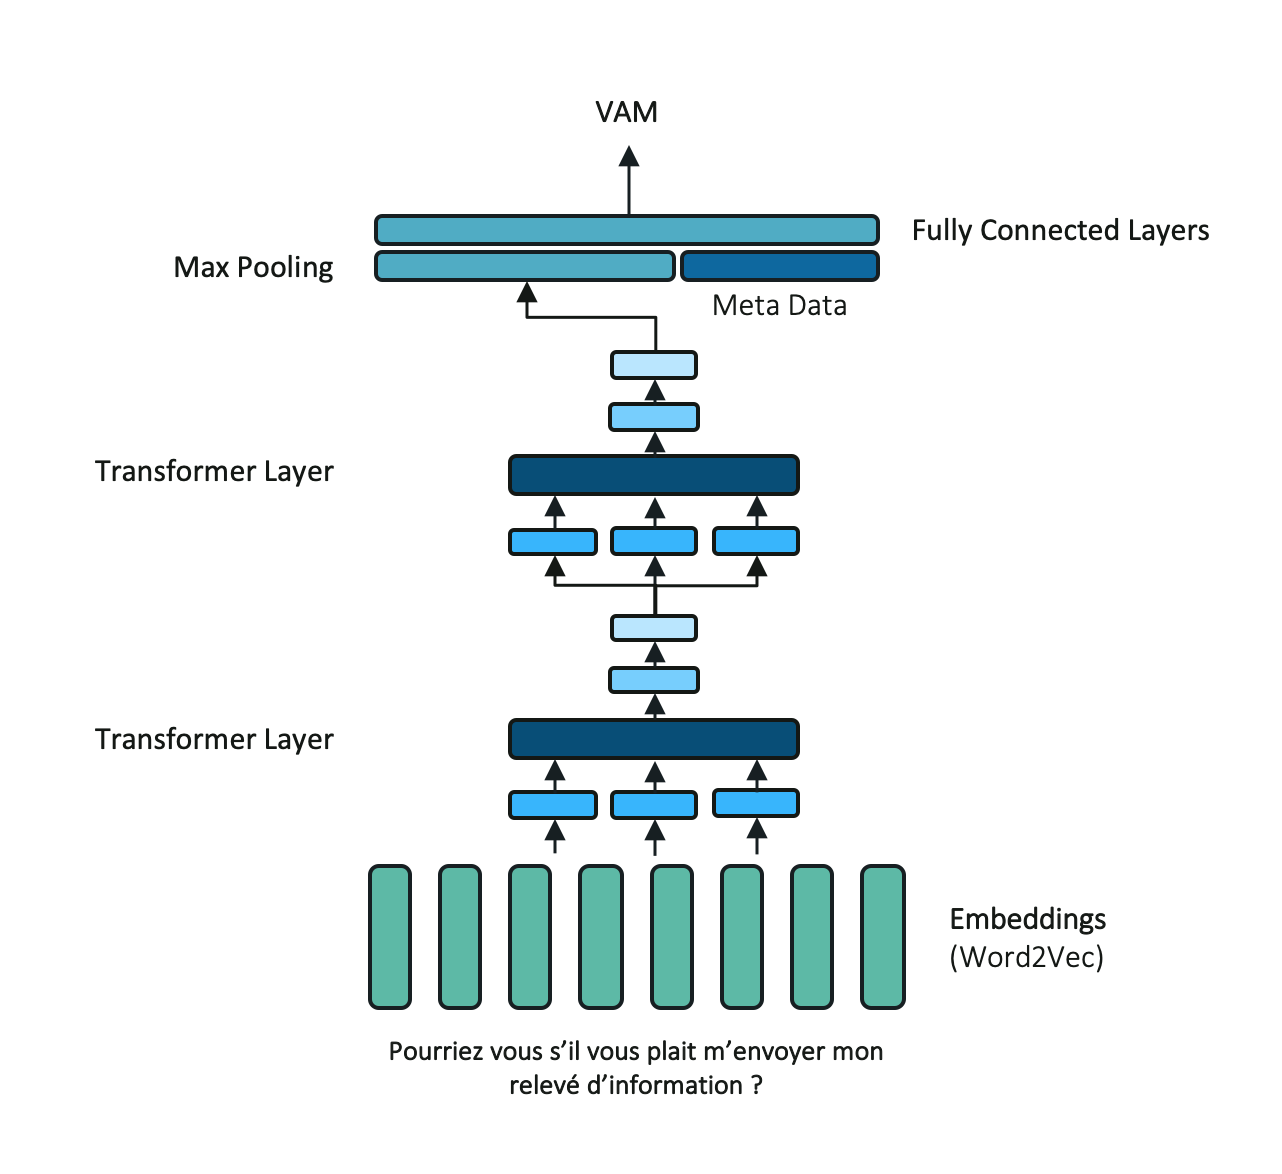
3.8.3. Attentive Neural Network Classifier
Attentive-based neural networks are fairly new in the NLP community but results are extremely promising. They rely on the self-attention operation which computes hidden states as a weighted sum from the inputs. As the multiple filters in the CNN architecture, the multi-branch attention aggregate multiple attention operation to capture various properties from the input. Such operation is easily perform on GPU infrastructure. We propose an architecture inspired from previously introduced RNN and CNN architecture with a two layers multi-branch attention module follow by a max pooling operation.
3.8.4. BERT Neural Network Classifier
We also propose a wrap-up for the popular pre-trained bert architecture. Bidirectional Encoder Representations from Transformers (BERT) take into account the context for each occurrence of a given word and will provide a contextualized embedding that will be different according to the sentence. However, we only use the first word embedding, usually called the classification token in our classifier model. We made available the two trending French models Camembert and Flaubert.

3.9. Use a custom config file
To optimize Melusine for your needs, a custom configuration file may be used. Through a custom configuration file, the user can specify parameters such as:
- Custom keywordsList of keywords that Melusine should focus on
Example: extract keywords with the KeywordExtractor
- Custom stopwordsList of stopwords that Melusine should ignore
Example: tokenize sentences with a Tokenizer
- Custom regular expressions (regex)regex used in the melusine functions
Example: Regex to detect that a message is a reply
The following code shows how to specify a custom configuration file:
from melusine.config.config import ConfigJsonReader

conf = ConfigJsonReader()

# Print the path to the current configuration file
with open(conf.path_ini_file_, 'r') as ini_file:
    print(ini_file.read())

# Print the content of the current configuration file
conf_dict = conf.get_config_file()
print(conf_dict)  # will print the json

# Set a new path to the configuration file
conf.set_config_path(file_path='my/path/conf.json')

# Print the new path to the configuration file
with open(conf.path_ini_file_, 'r') as ini_file:
    print(ini_file.read())

# Print the content of the new configuration file
conf_dict = conf.get_config_file()
print(conf_dict)  # will print the json
It is also possible to go back to the original configuration file:
from melusine.config.config import ConfigJsonReader

conf = ConfigJsonReader()
conf.reset_config_path()
Warning : the configuration file is loaded by the different modules (Tokenizer, KeywordExtractor, etc) during the import, therefore, for the new configuration file to be effective, the code / kernel should be restarted after each modification of the configuration file.
3.10. Use a custom name file
While working with text data, names might undergo specific processing:
stopword processing : if names don’t need to be identified, they may be discarded during the text processing
flagging : if names need to be identified but not specifically, names may be replaced with a name_flag (bob -> flag_name)
By default, Melusine identifies names using an explicit list of names available in a file (‘melusine/config/names.csv’). The default name list was adapted from a name dataset publicly available on the french government website. This list contains first names given to children (french or not) born in France between 1900 and 2018.
Melusine users may specify a custom name list using a custom ‘names.csv’ file.
The following code shows how to specify a custom configuration file:
import os
import pandas as pd
from melusine.config.config import ConfigJsonReader

conf = ConfigJsonReader()

# Print the path to the current name file
with open(conf.path_ini_file_, 'r') as ini_file:
        print(ini_file.read())

# Print the current name list
conf_dict = conf.get_config_file()
print(conf_dict['words_list']['names'][:5])

### Use a custom name file
# 1. Create a new (custom) name file
#    - The file should be a csv file with a column called `Name`
# 2. Set the new file as the current Melusine name file    with open(conf.path_ini_file_, 'r') as ini_file:
# Set a new path to the configuration file

# Create a name DataFrame
df_names = pd.DataFrame({'Name' : ['Daenerys', 'Tyrion', 'Jon', 'Raegar']})

# Path to the new name.csv file
new_path = os.path.join(os.getcwd(), 'data', 'names.csv')

# Save new name.csv file
df_names.to_csv(new_path, encoding="latin-1", sep=";", index=False)

# Set a new path to the name file in Melusine
conf.set_name_file_path(file_path=new_path)

# Print the new path to the name file
with open(conf.path_ini_file_, 'r') as ini_file:
    print(ini_file.read())

# Print the new file list
conf_dict = conf.get_config_file()
print(conf_dict['words_list']['names'][:5])
It is possible to go back to the original name file:
from melusine.config.config import ConfigJsonReader

conf = ConfigJsonReader()
conf.reset_name_file_path()

conf_dict = conf.get_config_file()
print(conf_dict['words_list']['names'][:5])
Warning : the name file is loaded by the different modules (Tokenizer, KeywordExtractor, etc) during the import, therefore, for the new name file to be effective, the code / kernel should be restarted after each modification of the name file.